
Bicycling through Yellowstone in the fall
Posted by Jim Steele on November 20th, 2016 filed in Mountain Biking, Yellowstone National ParkComments Off on Bicycling through Yellowstone in the fall
After seeing Old Faithful dozens of times, I experienced something new this fall: witnessing an eruption all by myself, in the middle of the day. I’ll never forget the experience of being the only person on the boardwalk for the world’s most famous water show.
After most of Yellowstone closes to cars in early November, some of the park roads remain open to bicyclists and hikers until snow makes them impassable. In many years, winter weather means that only the heartiest people venture far into the park in November. This year, a lack of snowfall and gorgeous weather conditions combined to create a perfect weekend to explore Yellowstone by bicycle.
On November 11, I set out to bike from West Yellowstone to Old Faithful, leaving on a chilly morning after sunrise to give myself as much time as possible to explore the geyser basins along the way and to stop at some of the turnouts that are just too easy to pass by when you are in a car. It’s hard to explain, but it’s easier to enjoy the scene when you’re not trying to race from one end of the park to the other at 45 miles per hour. Being on a bike makes you feel smaller, and the fact that you’re not protected by the shell of a car makes the wilderness feel closer. Scenes that you would normally drive right by on your way to the next geyser basin or trailhead become remarkable.
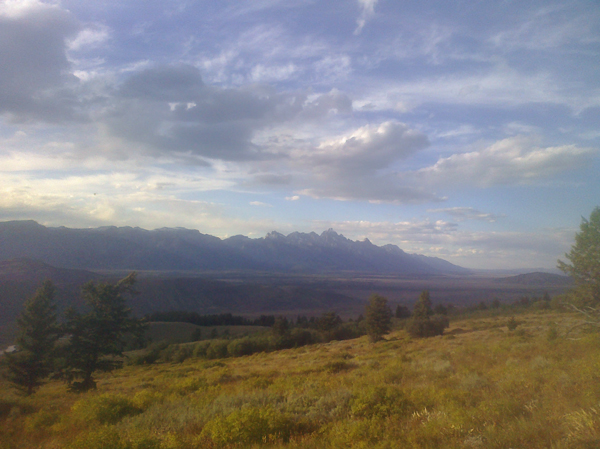
So for the 14 miles between West Yellowstone and Madison Junction, I savored the scenes from the pullouts. I took the time to bike along Riverside Drive. I enjoyed the view of Mount Holmes to the north and the glint of sunlight off the fire lookout. I saw buffalo roaming and elk crossing the Madison River. The road became much more than just a basic route into the park.
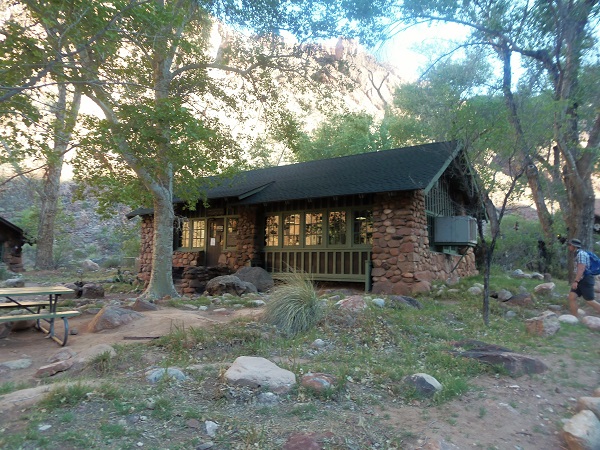
After a quick pause at Madison Junction (where a building with restrooms, a water fountain and snack machines remained open for anyone needing a pit stop), I started the 16-mile ride to Old Faithful, enjoying the ride along Firehole Canyon Road and the scenes of the geyser basins that dot the landscape. Finally I arrived at Old Faithful. Just minutes after I pulled in, Old Faithful began to erupt. I sat on the benches and realized that I was the only person watching. I had seen a few workers in the parking lot in front of the Old Faithful Inn a few minutes earlier (they could have been working on a major geological survey that was under way, or could have been park or concessionaire employees), but they were nowhere to be found. An eruption of Old Faithful was mine, and mine alone. I don’t know if I’ll have Old Faithful all to myself ever again.
I certainly didn’t that day; shortly after the eruption finished, more bikers started trickling in, with many asking me if I knew when the next one would be. I was glad to realize that others were out taking advantage of a day with temperatures in the 50s and, at times, not a cloud in the sky. I just had gotten an earlier start.
The next day, I returned to Madison Junction, then made the climb up Gibbon River Canyon to Norris Geyser Basin, relishing the views of Beryl Spring, Gibbon Falls and a bald eagle along the 14-mile segment. When I finally arrived at Norris, I was again surprised to find that there was no one in sight (there was one truck in the parking lot). As far as I knew, I had one of Yellowstone’s most famous geyser basins to myself. Just like the day before, another group of bicyclists arrived a few minutes after I did, having biked south from Mammoth Hot Springs.
I biked 130 miles over those two days. Although the early sunsets didn’t allow for a lot of exploration, I did have enough time for some side trips. I biked the Firehole Lake Drive, saw Grand Prismatic Spring and Sapphire Pool, biked to Morning Glory Pool, walked the boardwalk at Terrace Spring, hiked the Artists Paintpots Trail, and walked the Porcelain Basin boardwalk and to Steamboat Geyser at Norris.
Yellowstone amazes me every time I visit, and this trip was no exception. The feeling of traveling through the park without a car separating me from the wilderness was thrilling. Although it might be tough to make this trip this year because snow has finally fallen, keep an eye on the weather next spring, when there may be another opportunity to see Yellowstone by bicycle.
A few notes:
- There are virtually no services available within Yellowstone after the roads close. Make sure to pack everything you need and check with the National Park Service to find out which roads are open.
- Not all roads are technically open to bicyclists. Check the Yellowstone Web site.
- Unfortunately, the road from Madison Junction to Old Faithful typically is not open to bicyclists in the spring.
- A little elevation change can make a big difference. At Norris, which is about 900 feet higher than West Yellowstone, the breeze felt much more biting than at lower elevations.
- Although the roads are closed to the general public, there will still be some traffic from park rangers, concessionaires, and people working on facility maintenance.
Static Peak
Posted by Jim Steele on October 18th, 2016 filed in Grand Teton National ParkComments Off on Static Peak
Given that the Tetons are more famous for technical climbs like the Grand, it’s easy to forget that you can still get that top-of-the-world feeling with no more than a good set of hiking shoes. Static Peak is one of the best options if you want to see the Tetons and Jackson Hole from atop a mountain without needing climbing gear.
Static Peak rises to 11,303 feet and lies on the south end of the heart of the Teton Range, south of the Cathedral Group and north of Jackson Hole Mountain Resort. Static Peak sits in the shadow of the taller Buck Mountain and is accessed from the highest point of maintained trail in Grand Teton National Park at Static Peak Divide, which crests at 10,790 feet. From the Divide, you gain an additional 513 feet to reach the summit via a steep but manageable social trail that peters in and out. The hike from the trailhead to Static Peak Divide is 8.1 miles.
I love this hike. The view of Phelps Lake from the overlook a mile into the hike is enjoyable, you get a good taste of Death Canyon, and the view from the top is tough to beat. But it’s more than just the views that have made this trip meaningful to me. Whenever I hike up Static Peak – or attempt to hike up Static Peak – something memorable tends to happen. The second time I made it to the top was on an idyllic Indian Summer day when I had the summit to myself. I may have experienced the most mindful hour of my life as I enjoyed the scene and my lunch; after a solid hour, I realized I better head back down the trail or risk a night hike. Another trip was in early October when two friends and I thought – naively – that we would have no problems squeezing one last alpine hike in before winter set in, planning a shuttle from the Death Canyon Trailhead to the South Teton Trailhead on the west side of the Teton Range. Much to our surprise, the situation at the top was full-on winter. We didn’t make it to the top of Static Peak, but we did complete our shuttle over Static Peak Divide and Buck Mountain Divide, through Alaska Basin and down Teton Canyon. One of my friends had stuffed a winter-grade parka and sleeping bag in his backpack to add extra weight for training; we could not have been more grateful to have something warm to huddle under while we ate our lunch in winter conditions beneath Static Peak.
The fastest route is via the Valley Trail, Death Canyon Trail and Alaska Basin Trail from the Death Canyon Trailhead at the end of the Whitegrass Ranch Road. Unfortunately, parts of the Whitegrass Ranch Road are extremely rutted, so it is easy to scrape the bottom of a car. (After a rainstorm, mud could also create a major problem). High clearance vehicles are recommended, but I have managed to get my car to this trailhead several times (although not without a few scars). Your mileage may vary. To get to the trailhead, turn west on the Whitegrass Ranch Road from the Moose Wilson Road north of Teton Village and south of Moose. Follow the road until it ends at the trailhead (or as far as your nerves will allow – there are numerous parking spots along the way. Fortunately, it is only the final mile that is particularly frightening).
From the Death Canyon Trailhead, you technically take a spur route for a tenth of a mile until you arrive at a junction with the Valley Trail. Turn left (west) onto the Valley Trail, which takes you to the Phelps Lake overlook in about a mile. From this overlook at 7,200 feet, you have a postcard view of Phelps Lake and the valley beyond its moraine. If you have guests visiting and are only looking for a short hike (about two miles round trip), the Phelps Lake Overlook is a good option.
From the overlook, the trail descends toward the lake. After less than a mile, you come to a junction where you can continue toward the lakeshore on the Valley Trail. Instead, take the Death Canyon Trail, which will lead you toward the gaping mouth of Death Canyon. At this point you are almost certain to be wondering how a trail was carved out of the canyon walls. Before long, you’ll begin gaining elevation as the trail switchbacks to a narrow point where you enter the heart of Death Canyon.
After about four miles, the trail levels off (briefly) and you come to an area where a stream slows down before beginning a series of small cascades. Long grasses and a babbling brook make for a serene scene and offer a perfect spot for a mid-hike snack. Enjoy yourself, then continue on the trail. Soon you’ll arrive at the historic Death Canyon patrol cabin and the junction with the Alaska Basin Trail.
Turn right and begin a relentless climb up a seemingly endless series of switchbacks that will take you up the northeast corner of Death Canyon. As you rise, you’ll have perfect views of the heart of Death Canyon and you’ll understand without question how the Death Canyon Shelf was named. You’re almost certain to dream about pitching a tent in the Death Canyon camping zone as you wonder if your heart is going to give out before you climb out of the canyon.
As you start to approach the end of the switchbacks, you’ll come to an opening along the crest below Albright Peak where you will have a view of Jackson Hole to the east. A short social trail leads to the south, where you have another gorgeous view of Phelps Lake. I highly recommend that you take this quick side trip and enjoy another snack here. One of my more memorable Teton moments came when we did the October shuttle. From this perch we watched clouds quickly forming in the valley below. It was one of the most unforgettable moments of a hike that was memorable from start to finish.
When you return to the trail, the work will resume. Once you finish the climb out of Death Canyon, you will be treated to another view of Jackson Hole, this time of the north end of the valley toward Jenny Lake and Jackson Lake, from a ridgeline where the sight of Static Peak dominates the view. As you will see, you still have some work to do. From this point, another set of switchbacks will complete the climb to Static Peak Divide as you leave the forests of Death Canyon.
After you finally arrive at Static Peak Divide (marked by a sign), you have the option of finishing with the scramble to the top; 500 feet of elevation gain stand between you and the summit. The slope is steep but manageable, as long as you stay far away from the steep western and northern faces. Social trails lead most of the way through the talus to the top, but do tend to fade in and out. Note that you should start the scramble to the top from slightly before the Static Peak Divide sign.
And, finally, you arrive at the summit. The view is awesome, and it is one of the most attainable peaks in the Tetons. To the north, Buck Mountain dominates the skyline and you will also see the heart of the Tetons, Jenny Lake and Jackson Lake. Sleeping Indian towers above Jackson Hole to the east. You can see miles of the Snake River winding through the valley, and you also have an awesome view of the Jackson Hole Airport. And perhaps the most unappreciated part of this view is the sight of Rimrock Lake, tucked into the southern walls of Death Canyon and just begging to be climbed to. Every time I see this lake, I dream about waking up along its shores. As you will see from the summit, that would be much easier said than done.
From the summit of Static Peak, you have several options beyond just returning to your car.
- One mile to the west is Buck Mountain Divide, and this makes a great side trip before you retrace your steps down Death Canyon. The hike to this divide takes you through an alpine area, directly below Buck Mountain. From Buck Mountain Divide, you have a good view into Alaska Basin.
- If you are really motivated, you can continue past Buck Mountain Divide into Alaska Basin.
- If you are able to arrange a shuttle or a key swap, leave a car at the South Teton Trailhead in Teton Canyon (accessed via Driggs, Idaho). The route from Death Canyon Trailhead, over Static Peak Divide and Buck Mountain Divide, through Alaska Basin, and down Teton Canyon is 19 miles.
Note: With winter around the corner, your opportunity to do this hike this year has probably passed, so add this to your Summer 2017 bucket list.
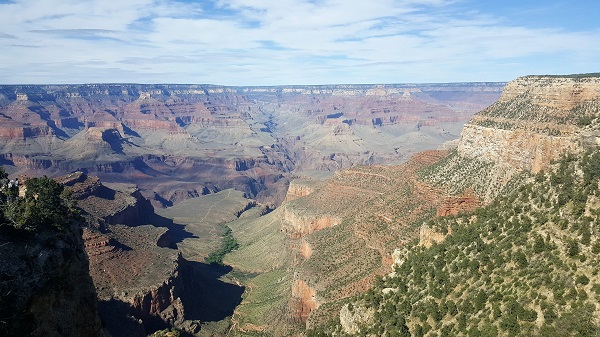
The Grand Canyon, Part 2: South Rim to North Rim
Posted by Jim Steele on August 17th, 2016 filed in Grand CanyonComments Off on The Grand Canyon, Part 2: South Rim to North Rim
NOTE: This is my second article about my adventures in the Grand Canyon in the Spring of 2016. In April 2016, I hiked from the South Rim Village to Phantom Ranch and back. This article describes my May 2016 Rim-to-Rim hike from the South Rim to the North Rim. The article about my April hike to Phantom Ranch is here.
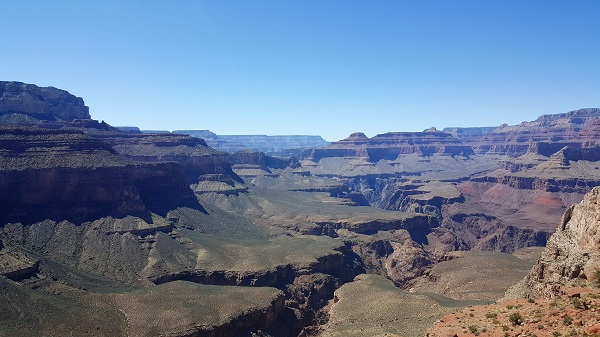
A Rim-to-Rim hike in the Grand Canyon is one of the truly iconic adventures in the national parks. We lived in Las Vegas for a year and while we were there, I wanted to check the Rim-to-Rim journey off my bucket list. Because who doesn’t want to hike 22 miles in a day while gaining more than a mile of elevation? My wife thought I was crazy, and she was probably right.
Unfortunately, the optimal season for this hike is short (basically mid-May to early June and mid-September to mid-October in order to avoid the worst of the heat at the base of the canyon and still make the trip while the North Rim Village is open). I hadn’t been able to plan anything in advance, so I was crossing my fingers that I would be able to put an adventure together at the last minute in the second half of May. But the logistics of a Rim-to-Rim hike are challenging at best. You generally need somewhere to stay on the South Rim, somewhere to stay on the North Rim, and transportation for the circuitous four-hour drive that links them. Reservations at the lodges, naturally, tend to fill up quickly. And it would be a shame to get everything planned and then be rained out.
The view from the Bright Angel Trailhead. The trail to Plateau Point is visible near the center of the photo.
My trip started off with a burst of luck. Motel rooms in Williams were fairly expensive so I had booked an economy room. I checked for last minute specials and was able to get a room at the Grand Canyon Railway Hotel for the same price. This hotel is massive (by Williams standards), is reasonably new, and seems to exist to house tour groups that arrive in town before they set off for the South Rim, 60 miles to the north, via the Grand Canyon Railway. The hotel was pleasant, my room was comfortable, and I got to see some of the train memorabilia that is scattered around the property. I was a happy camper. Williams is the last town of any significance before you arrive at the South Rim Village, about an hour to the north (excluding the tourist trap town of Tusayan), so I stocked up on supplies at the Safeway, headed back to my hotel, ate dinner, packed my backpack, and got to bed at sunset in anticipation of an early departure the next morning.

Switchbacks along the Bright Angel Trail.
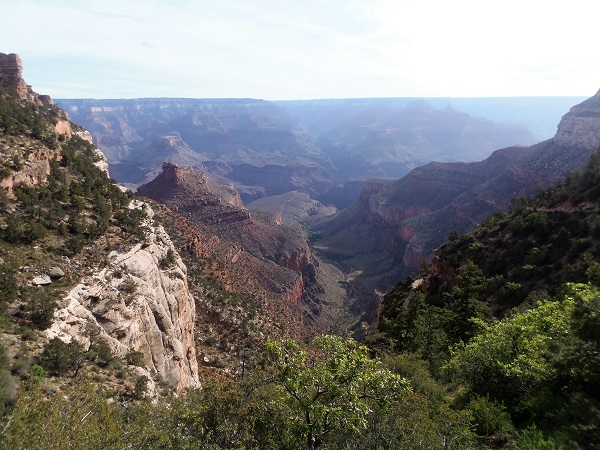
I carefully began descending via switchbacks that are carved into the side of the canyon and can accurately be described as engineering masterpieces. I passed the Mile and a Half Resthouse and the Three Mile Resthouse without incident and saw plenty of people along the way – this was a Saturday in May, and there were numerous other people who wanted to explore the Grand Canyon. And I saw the trail to Plateau Point in the distance, remembering one of the most awe-inspiring places I had visited the month before. Finally I arrived at the Indian Garden Campground, where I refilled my Camelbak with the fresh water that is piped in by the National Park Service. The trailhead for Plateau Point is at Indian Garden Campground, but there was no time for that side trip today.

A blooming cactus.
After 7.5 miles, I finally reached the Colorado River at Pipe Creek Beach. Having taken both trails, I was able to conclude that the views from the South Kaibab Trail are definitely more sweeping than the views from the Bright Angel Trail, but that both make for an awe-inspiring trip into the Grand Canyon. After dipping my hands in the water and taking a selfie, I was back on the trail for the hike to Phantom Ranch, where I planned to have lunch. This section of the hike is very pleasant – the trail undulates along the shores of the Colorado River, giving you plenty of time to contemplate the forces that carved the dramatic canyon. But it was at this point that the magnitude of what was ahead of me – 14.5 more miles of hiking and about 6,000 feet of elevation gain – started to hit me. It made it harder to enjoy the setting.
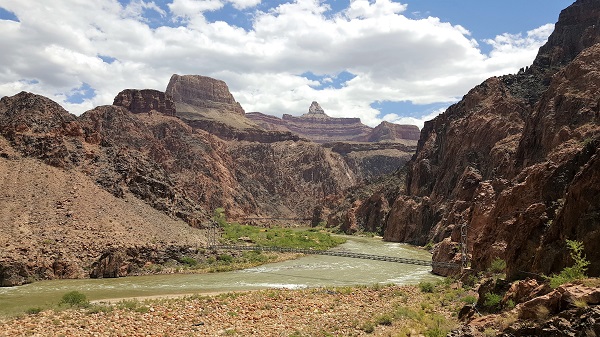
The Colorado River at the base of the Grand Canyon. Both footbridges are visible.

A section of “The Box.”
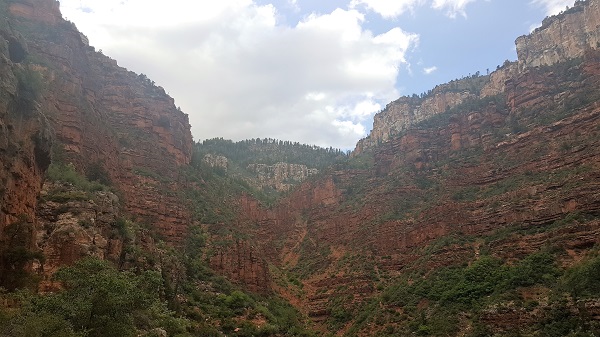
The problem is that for eight miles after Phantom Ranch, the elevation gain is very gradual and you gain “only†2,000 vertical feet as you hike through The Box, pass a short spur trail to Ribbon Falls, pass the Cottonwood Campground (which seemed like it would have been a great place to camp; note that seasonal water is available), and finally arrive at the Pumphouse and the residence for its caretaker. As this was my first Rim-to-Rim hike, I kept wondering when the real work would begin and just how bad it was going to be. I found out when the trail split from the Old Bright Angel Route, took a turn to the northwest, and began gaining elevation very quickly. From this point, you gain 3,700 feet over about four miles. Fortunately, the views distracted me from the misery. This section of the trail is comparatively lush (especially compared to the desert-like segments near Phantom Ranch), with more trees. The colors are also striking. I was taken aback by the deep reds of the canyon walls, particularly their sharp contrast with the trees. It’s a different experience from the base of the canyon, and a different experience from the South Rim.
The climb to the North Rim.
And, fortunately, my adventure wasn’t over. Trans-Canyon Shuttle generally offers two shuttles per day from the North Rim to the South Rim (one shuttle per day in the second half of October) and I had scheduled the late shuttle (leaving at 2 p.m.) in order to give myself some time to explore the North Rim area. But first I had to get to my cabin. The North Rim Lodge is located about two miles from the North Kaibab Trailhead via the Bridle Trail. While most people would probably ask someone for a ride, I chose to walk. I arrived at the Lodge after sunset, quickly registered, and took a minute to enjoy the view of the Grand Canyon from the great room of the Lodge. It was a postcard view and I was glad I would have some time to explore the next day. I felt that the views from the North Rim were even better than the views from the South Rim, likely helped by the fact that the North Rim sits 1,400 feet higher than the South Rim, but also assisted by favorable topography.

The North Rim Lodge.

The view from Bright Angel Point.
A view from the Transept Trail.

A Pueblo foundation along the Transept Trail.
Then at 2 p.m. my shuttle left to return to the South Rim via Jacob Lake, Marble Canyon and Cameron. Our driver pointed out many of the sights along the way, and one of the highlights was the view of the Vermillion Cliffs. By around 6 p.m., I was back at my car, thrilled with my trip but sad that it was over. I will never forget my Rim-to-Rim hike.
Note: As I wrote in Part 1, I have only hiked the Grand Canyon twice and don’t claim to have any particular expertise. However, I learned a lot while researching this trip and had a great time, so I am sharing this article in hopes that someone can benefit from my experiences. There are plenty of ways to experience the Grand Canyon and there is no shortage of information online. Remember that what worked for me may not work for you. With that said, here are a few more notes:
- The Park Service bends over backwards to advise people not to hike Rim to Rim in a day, or to hike from the Rim to the Colorado River and back in a day. While I have no doubt that this advice is appropriate for 99 percent of visitors, it obviously doesn’t mean that a Rim-to-Rim hike can’t be done. Whatever adventure you are planning, know your limits and make sure you factor in the variations in weather between the North Rim, South Rim and Phantom Ranch.
- Having hiked down via both the Bright Angel and South Kaibab trails, the views from the South Kaibab Trail definitely are better than the views from the Bright Angel Trail. But the Bright Angel Trailhead is somewhat more accessible and the availability of water along the Bright Angel Trail is a major selling point.
- Service from the Trans-Canyon Shuttle was outstanding. My shuttle left on time and arrived early. The driver made sure to point out notable landmarks along the way and never got tired of our questions.
- Remember that hiking from the South Rim to the North Rim entails 1,400 more feet of elevation gain than hiking from the North Rim to the South Rim. If you have any doubts about whether you are ready for this trip, go from North to South.
- If you don’t want to go all the way to the Colorado River, day hikes to Supai Tunnel (from the North Rim) or to Plateau Point (from the South Rim) are also great options. Even these hikes, however, can be challenging; know your limits.
- Cell coverage at the North Rim is hit and miss. It seemed to be overflow coverage from the South Rim, so don’t expect a strong signal.
The Grand Canyon, Part 1: South Rim to Phantom Ranch
Posted by Jim Steele on July 19th, 2016 filed in Grand CanyonComments Off on The Grand Canyon, Part 1: South Rim to Phantom Ranch
During our year living in the Las Vegas area, I had a bucket list of places I wanted to see and things I wanted to do. It included trips to Zion, Bryce Canyon and Death Valley national parks, a hike up Mt. Charleston, and – most daunting – a Rim-to-Rim hike in the Grand Canyon.
The more I researched it, the more challenging the Grand Canyon trip seemed. The National Park Service bends over backwards to discourage Rim-to-Rim hikes and does everything possible to remind you that dozens of unprepared hikers become statistics every year. The timing of the trip is challenging. It’s best to avoid the middle of the summer, but the season at the North Rim is short (mid-May to mid-October), so the optimal window includes part of May, part of September and part of October. The logistics are just as tough. Even though they are only 12 miles apart as the crow flies, the drive between the Bright Angel Trailhead and the North Kaibab Trailhead takes four hours, and hotel reservations at both rims are tough to get. And the sheer distance and elevation gain involved — 22 miles and 6,000 feet of elevation gain (if you finish at the North Rim) – will humble all except the most extreme athletes.
But I couldn’t get this trip out of my mind. I had been teased with a view of the Grand Canyon on a flight from Atlanta to Las Vegas. I couldn’t wait to actually get there.
My first break came in late April, when I was able to secure a last-minute reservation at Phantom Ranch. Phantom Ranch is a complex of dorms and cabins near the Colorado River at the base of the Grand Canyon, inaccessible by road, supplied by mules and originally built in 1922. It caters to hikers and people on Colorado River trips. April was too early to do a Rim-to-Rim trip, so I figured that South Rim-to-Phantom Ranch-and-Back would be a great consolation prize.
The Phantom Ranch Canteen, where meals are served.
A view from the South Kaibab Trail.

A cactus bloom.
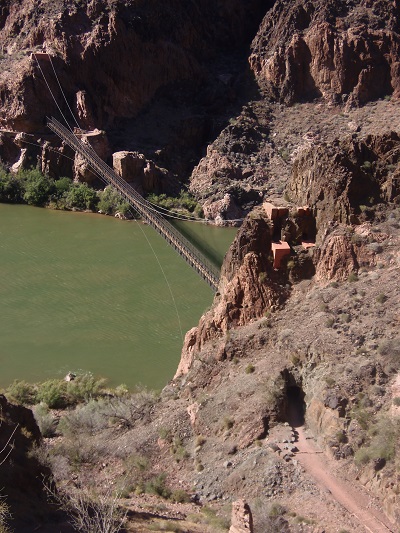
A suspension bridge over the Colorado River. The trail goes through a tunnel before it reaches the bridge.
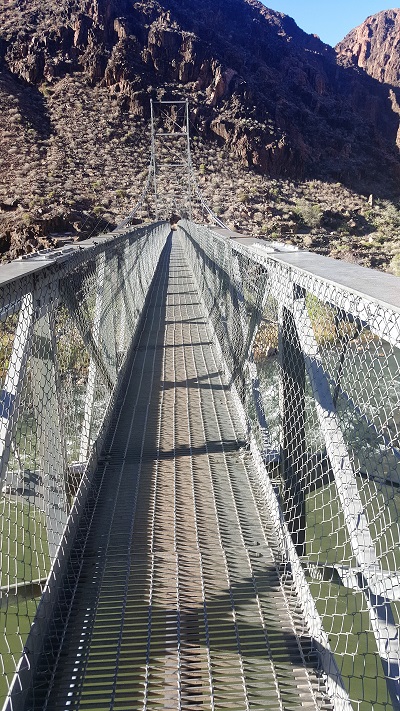
A suspension bridge over the Colorado River.
Phantom Ranch is truly unique. There are few places in the national parks where you can stay in a reasonably modern hotel setting that is miles from the nearest road. From prime real estate at the base of the Grand Canyon, Phantom Ranch offers private cabins or shared dorm rooms (10 beds per dorm) with showers (one per dorm, or shared showers for people staying in the cabins), electricity, and a canteen that serves a hot breakfast and dinner (reservations are required for both) and sells sack lunches. It’s a special, quaint place, and it’s a lot of fun. It’s not as intimate as Granite Park Chalet in Glacier National Park, but the feeling is similar.

Prices for snacks, goods, rooms and meals at Phantom Ranch.
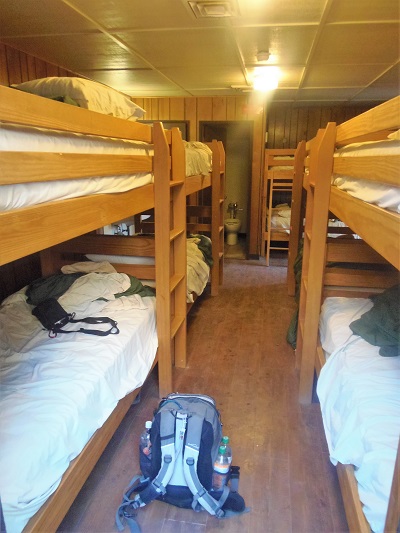
A dorm at Phantom Ranch.

The Colorado River from one of the two suspension bridges that link the South Rim and the North Rim.
The next morning I had breakfast at 6:30 a.m. with the late group, picked up my sack lunch from the canteen, filled my Camelbak, and set off to gain 4,460 feet on my way up the Bright Angel Trail.
After crossing the suspension bridge, the trail follows the river and gains little elevation, making for a pleasant segment of the hike – but one in which I kept wondering when the pain would begin. It came soon enough.

The view of the Colorado River from Plateau Point.

The wall that the Bright Angel Trail ascends.
The view from the Bright Angel Trailhead. The trail to Plateau Point is visible near the center of the photo.
But the views were worth the pain.
Coming Soon: I managed to put a Rim-to-Rim hike together after all. My next article will tell the story.
Note: A quick Google search shows that there is no shortage of advice on hiking into the Grand Canyon. I’ve only done it twice, so I don’t claim to offer any unique expertise. I am posting this article in hopes that someone can benefit from my perspective, but with the caveat that there are many different Grand Canyon adventures to be had, and what worked for me may not work for you. With this in mind, here are some more tips:
- There are resthouses about 1.5 miles and about 3.0 miles from the Bright Angel Trailhead, and water is generally available at these resthouses during the summer. Water is typically available year-round at Indian Garden. Each of these three locations also has outhouses.
- To get to the South Kaibab trailhead, you have to take the free bus system. Parking at the main lot at the visitor center will save you from having to make a transfer.
- Phantom Ranch inevitably books out far in advance. If you have any flexibility, rooms sometimes open up due to last-minute cancellations. Phantom Ranch reservations are currently only available by phone.
- Bring a calling card – there is one pay phone at Phantom Ranch and another located near the river.
- Breakfast at Phantom Ranch on my trip consisted of pancakes, bacon, canned fruit, coffee and orange juice.
- Check-out time from the dorms is 7:30 a.m. My dorm had a couple of power outlets.
- The temperature at the base of the canyon will tend to be 20 degrees higher than at the South Rim. If you are doing this hike in the middle of the summer, it’s best to time your hike so that you aren’t at the base of the canyon at the hottest time of day.
- The elevation at the South Kaibab trailhead is about 400 feet higher than the Bright Angel Trailhead. Since the South Kaibab Trail is also shorter (7.4 miles to Phantom Ranch, vs. 9.9 miles on the Bright Angel Trail), the average grade of the South Kaibab Trail is materially steeper. Per the National Park Service, Rim to river elevation change on the South Kaibab Trail is 4,860 feet and elevation change on the Bright Angel Trail is 4,460 feet.
- There is some cell service at South Rim Village, and some of the signal bleeds into some areas of the canyon. Depending on who your carrier is, you might get some coverage on some sections of this hike. There isn’t any connectivity at all at Phantom Ranch.
- A backcountry campground, Bright Angel Campground, is located near Phantom Ranch.
My new novel, The Yellowstone Apertures, is available on Nook and Kindle
Posted by Jim Steele on December 19th, 2015 filed in NewsComments Off on My new novel, The Yellowstone Apertures, is available on Nook and Kindle
I am thrilled to announce that my first novel, The Yellowstone Apertures, is now available on the Barnes & Noble Nook store and the Amazon Kindle store.

If you like suspense novels or stories about Yellowstone, I hope you will enjoy my novel! Email me with your questions: steelejim@att.net.
I’m also excited to announce that I’m already at work on my second novel, which is set in Glacier National Park and will have a financial crime angle.
Mt. Glory
Posted by Jim Steele on January 11th, 2015 filed in Around TownComments Off on Mt. Glory
When you hear someone talking about Mount Glory, it’s usually because they were skiing.
But Mount Glory makes a great hike, too – the kind of place where you don’t have to wait long to find your head in the clouds because you gained 2,000 feet of elevation driving up Teton Pass, then gained another 1,500 feet in less than a mile of hiking.
Yup. That’s right. You gain 1,500 feet in 0.9 miles. This is one of the steepest hiking trails around. But you’ll enjoy the view from the south end of the Teton Range at the top. I can’t think of anywhere else that you don’t even have to hike a mile to take in a view like this. To the east, you’ll see the town of Jackson and the Gros Ventres beyond. To the southeast, the Snake River winds through the South Park area. The Snake River Range absolutely dominates the view to the south. Taylor Mountain is unmistakable to the northwest. And to the north, you’ll see the heart of the Tetons, albeit from a distance.
Just don’t get the idea that you’re not going to have to work for it. The hike starts at the top of Teton Pass, with an unmarked, but obvious, trailhead just across the highway from the parking lot. You start gaining elevation with your first step, and you don’t stop until you’re at the summit. If this trail was much steeper, you’d be mountain climbing instead of hiking. Keep this in mind on the way down; you’re almost guaranteed to land on your lower end once or twice.
But 0.9 miles of unswitchbacked, unmaintained trail later, you finally arrive at the summit, treated to what might be the finest view in the Tetons accessible in under an hour. The perspective of the town of Jackson from Mount Glory is particularly noteworthy. Even Snow King Mountain looks like an anthill.
You can continue hiking north along the ridgeline, enjoying the views of Taylor Mountain and Glory Bowl. It is possible to create a loop via Ski Lake and the Phillips Canyon Trailhead, but note that the junctions aren’t marked and you’ll need to find a guidebook that includes the trail or use a topo map. For best results, leave a second car at the Phillips Canyon Trailhead to avoid walking along the Teton Pass highway.
Note that due to lingering snow, you probably won’t be able to get to the top until July.
Granite Park Chalet
Posted by Jim Steele on December 28th, 2014 filed in Glacier-Waterton International Peace ParkComments Off on Granite Park Chalet
It sounds a lot like camping.
You go to sleep surrounded by some of the world’s most beautiful peaks. You’re miles from the nearest road. Nearby trails can take you even deeper into the mountains in almost any direction. Bears, mountain goats and deer make their home nearby. The sunset sweeps across the horizon and the stars have never felt closer.
Granite Park Chalet as seen from the Highline Trail, photographed September 28, 2008.
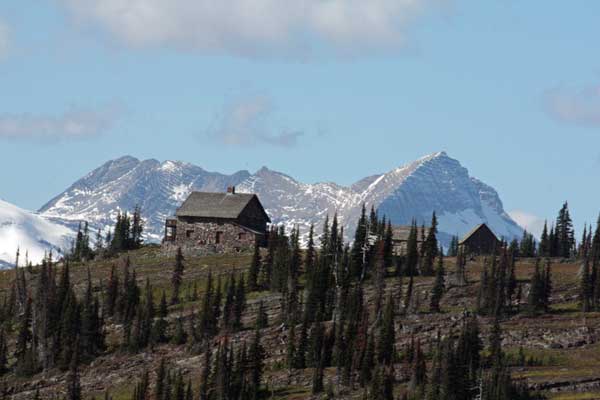
But you’re not camping. You’re staying in Granite Park Chalet in Glacier National Park. Granite Park, one of two chalets remaining from the network built by the Great Northern Railroad in an attempt to incent customers to ride its trains out to Glacier, is the rarest of breeds – an oh-so-basic lodge without running water, electricity or a parking lot that caters to backpackers. At Granite Park Chalet, you’re four miles from the nearest road and 6,700 feet above sea level, yet you have a roof over your head and a kitchen where you can make a hot meal.
Granite Park Chalet offers a truly unique backcountry experience. It’s an experience to be savored.
I’ve hiked into the chalet with my dad, but only after the end of the brief two-month operating season. The buildings were boarded up and, even though I was fascinated by the thought of spending the night in a building so far off the beaten path, I couldn’t go inside. I finally managed to spend some time at the chalet this summer as it was celebrating its 100-year anniversary, hiking in via the famous Highline Trail and hiking out to the remote Goat Haunt Ranger Station, where I caught a boat shuttle into Waterton Lakes National Park in Alberta.
At the end of a trip that included 53 miles of hiking, two national parks, two nights at the chalet and another night in Waterton, there’s no doubt in my mind that I’ll be back.
But before you plan your trip, there are a few key caveats to consider: The accommodations at Granite Park Chalet make a hostel seem luxurious. You will stay on bunk beds that creak loudly with the slightest movement and on top of mattresses that have never heard the term “memory foam.†The walls are paper thin and if your neighbors snore, fight – or even roll over on the creaky bunks – you are guaranteed to know. Even when my neighbors spoke in a voice barely above a whisper, I knew that they were talking. There will likely be mosquitoes, especially early in the season. Without running water, there are no showers. The facilities are limited to two advanced pit toilets. You’ll work up a sweat on the hike in, and you’ll be stuck with the trail grime until you get back to civilization.

A room at Granite Park Chalet, photographed August 3, 2014.
But what the chalet lacks in amenities, it makes up for in character. The 100-year-old stone walls of the main chalet are perfectly situated to offer sweeping views of the Livingston Range to the west, of Heavens Peak to the southwest, and of Logan Pass and Mount Oberlin to the south. The main chalet and an annex sit at the junction of two trails that lead to Glacier’s famous Going to the Sun Road, another trail that leads to the Swiftcurrent / Many Glacier area, and a trail that leads to the Fifty Mountain backcountry campground and Goat Haunt. The dining room is a great place to share backcountry tales with your fellow hikers or simply to enjoy the view.
And the staff of the chalet will take good care of you. This summer, Lars, Luke, Matt and Morgan spent every day of the early July to early September operating season at the chalet, overseeing the kitchen, cleaning the rooms, hiking out to a small dam to bring back water, selling packaged food to backpackers and overnight guests, and giving an evening program around the fireplace in the dining room. Lars and Luke are both seasoned veterans while Matt and Morgan were spending their first summer at the chalet. They all were fountains of knowledge and answered dozens of my questions about the chalet, the surrounding mountains, and the trails.
This summer, rooms cost $97 for one person (plus $78 for each additional person in the room, plus tax), with an optional linens package available for $20 that saves you from having to carry a sleeping bag; it was worth every penny. You get accommodations in a room that is as Spartan as they come – bunk beds, a small dresser, and a chair or two – along with access to a clean kitchen that includes a propane stove and range. If you want to keep it simple, the staff will help you boil water for dehydrated camp meals and warm drinks, although some more culinary-minded people also cooked a roast and muffins while I was there.

A section of the Highline Trail near Logan Pass. Photographed August 1, 2014.
The best route into Granite Park Chalet is via the Highline Trail, an eight-mile trek that starts at 6,600 feet above sea level at Logan Pass – the top of the Going to the Sun Road – then follows a fairly level route to the chalet that starts out on a segment of trail that was blasted out of the cliffs (there is a railing to hold on to), winds through the famous Garden Wall, skirts around Haystack Butte, then offers a postcard view of the chalet for the final two miles of the approach. Although you follow the path of the Going to the Sun Road for most of the route, the higher elevation makes the views vastly superior. The mountains of Glacier feel even more formidable once you get out of your car, and you’ll enjoy the possible sightings of mountain goats and wildflowers.
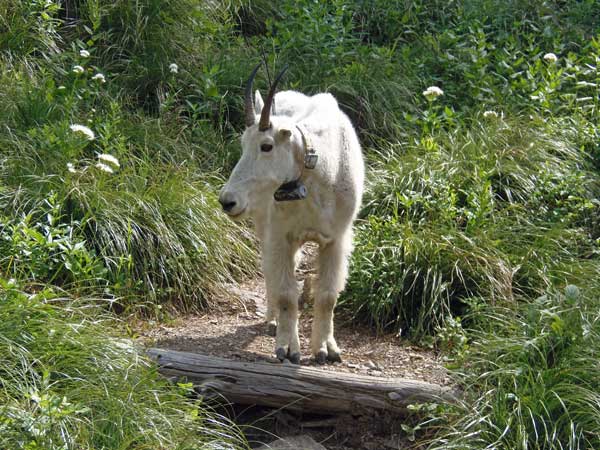
A mountain goat along the Highline Trail, photographed August 1, 2014.
Other hikers take the trail from “The Loop†into the chalet, a four-mile trip that gains 2,300 feet from a trailhead that is lower on the Going to the Sun Road. This trail doesn’t offer the superior views of the Highline Trail, but early in the chalet’s two-month operating season, it may be the only route in, as the chalet sometimes opens before crews finish plowing the Going to the Sun Road, and snow often lingers on the Highline Trail well into July. Day-hikers often start at Logan Pass, hike into the chalet for a snack, then take the Loop trail out – an itinerary that is simplified by Glacier’s public shuttle system, which allows you to park at the Apgar Visitor Center, take a shuttle to Logan Pass, then pick up another shuttle at The Loop.

Snow comes early at Granite Park Chalet. This photo was taken on September 23, 2006.
People also come or leave via the Swiftcurrent Trail, an eight-mile trip that starts or ends a mile from the Many Glacier Hotel. From Granite Park Chalet, you would lose 2,300 feet of elevation; if you were starting at Swiftcurrent, you would have a challenging climb as you ascended Swiftcurrent Pass. If you arrange transportation in advance, a hike in via the Highline Trail and out via the Swiftcurrent Trail would offer a tremendous variety of scenery.
For the more adventurous, a 22-mile hike to the north leads to the Fifty Mountain backcountry campground and the forebodingly-named Goat Haunt, which sits at the south end of Waterton Lake, a glacially carved jewel that spans the United States-Canada border. Boat shuttles are available from Goat Haunt into the Waterton Townsite in Waterton Lakes National Park, Alberta. The trail to Fifty Mountain features sweeping views that rival the Highline Trail, with particularly dynamic views at a divide above the campground – a spot where you will likely be able to count at least 35 mountains. If you take this route, be sure to ask about the condition of the Ahern Drift, which often blocks the trail well into July.

The Swiftcurrent Fire Lookout, photographed August 2, 2014.

The view toward Many Glacier from the Swiftcurrent Fire Lookout, photographed on August 2, 2014.
Some people spend only one night at the chalet, but a trip would ideally include at least two nights so that you have a day to take advantage of the nearby day hikes. From the chalet, you can hike to the Swiftcurrent Fire Lookout, a 2.3-mile hike to a fire lookout at 8,400 feet above sea level and from which you have sweeping views in every direction. The Grinnell Glacier Overlook is less than two miles from the chalet and offers a chance to view one of the park’s receding glaciers and enjoy more sweeping views. I recommend both if you’re lucky enough to have a “layover†day at the chalet.

One of the many amazing views from the Grinnell Glacier Overlook, photographed on September 28, 2008.
Unfortunately, the logistics of a trip to the chalet can be challenging. Reservations fill up quickly as soon as the next season’s bookings open late in the previous year, although hit-and-miss availability opens up throughout the winter, spring and summer as people change their plans. In addition, the trail from “The Loop†can be the only route into the chalet that is open for several weeks in July due to lingering snow. Combining routes like the Highline Trail and the trail into Many Glacier requires a ride on the East Side Shuttle by Glacier Park Inc. or a shuttle by Xanterra Parks and Resorts. The ability to take the boat shuttle from Goat Haunt across Waterton Lake is limited due to United States customs requirements (United States Customs and Border Patrol actually operates a customs station at Goat Haunt during the summer). You run the risk of bad weather.
But if you manage the details carefully, you’ll be treated to a stay in one of Glacier’s most gorgeous spots, a place where you can be treated to a panoramic sunset, a place where you’ll be surrounded by mountains, and a place where you’ll have a roof over your head even though you’re a two hour hike from the nearest road.
With any luck, those stone walls will stand for another hundred years.
Links: Granite Park Chalet, Glacier National Park trail conditions
Review of “Tell It on the Mountain: Tales from the Pacific Crest Trail”
Posted by Jim Steele on October 20th, 2013 filed in NewsComments Off on Review of “Tell It on the Mountain: Tales from the Pacific Crest Trail”
The thought of spending months in the wild, hiking a trail like the Continental Divide Trail or the Pacific Crest Trail, initially elicits a feeling of romanticism in me. Knowing that you are going to experience something new every day … the thought of waking up surrounded by mountains, morning after morning … experiencing an enormous variety of nature, from deserts to pristine alpine lakes … the view from all of those high mountain passes … escaping the modern conveniences that I love (probably too much) … having all that time alone with your thoughts … it all makes me wish that I was one of those people embarking on a thru-hike of one of these sprawling trails each spring.
But then I remember the downsides. The constant wear and tear on your joints. Eating tasteless camp food for meal after meal. Being completely at the mercy of the weather. Being gone from home for months on end. Carrying a heavy pack day after day. Blisters. Mosquitoes. Infection. There’s a lot that can go wrong when you’re averaging 20 miles every day, week after week, month after month.

A Pacific Crest Trail sign in front of Mount Hood near Timberline Lodge.
Lisa Diener (director, editor and writer) and Shaun Carrigan (producer and director of photography) have managed to show both sides of the Pacific Crest Trail experience in a new documentary called “Tell it on the Mountain: Tales from the Pacific Crest Trail.†The two-hour movie follows seven backpackers who are trying to hike all the way from the Mexican border to the Canadian border through southern California, the Sierra Nevada and the Cascades of Oregon and Washington. The director and producer outfitted these hikers with cameras so they could tell their own stories as they tried to complete a 2,663-mile journey that could only be described as the trip of a lifetime. You feel the enthusiasm as they start, and then you feel exhaustion begin to set in as the distance from the trailhead grows.
The director and producer found a truly eclectic group and skillfully allowed them to use their own words to tell the story; the narrator is silent for most of the two-hour film. You’ll meet three people who have come from Europe to complete the PCT, a couple who plan to get married in the middle of their journey, a man who has hiked the PCT so many times that he might as well change his address, and an old codger named “Billygoat†who doesn’t let the fact that he’s about 70 years old keep him off his feet. Who doesn’t want to experience an adventure like this through the eyes of someone nicknamed “Billygoat�
The characters all have their own stories, and it doesn’t take long before you’re rooting for each of them to make it to Canada. Unfortunately, it isn’t that simple. Not everyone is able to finish and even for the hikers that do, the ending isn’t necessarily 100% happy. One backpacker has a major surprise in store, and his story alone makes this movie worth watching.
These hikers, along with the trail angels (volunteers who provide support to thru-hikers) and a “section hiker†(a person hiking only a portion of the PCT) who covers 300 miles in the Sierra Nevada, tell the story of the PCT better than any narrator could. You learn about what drove them to try something that seems nearly impossible to a flat-lander. You experience the challenges of the trail – the contaminated water, the terrifying, unbridged crossings over roaring rivers, health issues like infected toes or sciatic nerve pain, the logistics of making sure that your next batch of food is waiting at the next supply point – through their own eyes. You see the beauty of the trail, from the barren sections in Southern California to the endless passes of the Sierra Nevada to the isolation of the PCT in Washington. Perhaps most poignantly, the hikers tell you what nature means to them and what draws them to the PCT. You won’t forget their words.
I’ve hiked sections of the PCT in Oregon and Washington. Two summers ago, I ran into a group of thru-hikers at Timberline Lodge on Mount Hood and talked to them about their trip. After they told me what they were doing, I said something like, “That sounds incredible.†Having seen “Tell It on the Mountain,†I understand the slightly hollow, exhausted look I got in return as they were mere hundreds of miles from their goal.
I’ve also hiked some sections of the Continental Divide Trail in Yellowstone, hiking to the Shoshone Geyser Basin and Summit Lake. I remember seeing the CDT logos along the trail, but I never fully appreciated the implications of a 3,100-mile trail stretching from Mexico to Canada. I’ll never take one of those signs for granted again.
Overall, this is a well done documentary that does an excellent job of showing both the beauty and the agony of a 2,600-mile thru-hike through the eyes of a truly interesting cast of characters. I wish that there had been more time to talk about the Oregon and Washington sections of the trail; it felt like the California sections received a disproportionate amount of attention. I wish that there had been more time to explore the actual logistics of the trip, like what’s in the hikers’ backpacks and what they do to remain healthy on the trail. And I wish that the producers had decided to letterbox the footage shot by the hikers, which didn’t have a full widescreen aspect ratio, instead of stretching it; the distortions, although relatively minor, were distracting. But these are minor complaints about a documentary that I thoroughly enjoyed.
And you’ll be glad to know more about the Pacific Crest Trail – it’s a hot topic right now. Cheryl Strayed’s book “Wild: From Lost to Found on the Pacific Crest Trail†has led more and more people to consider a thru-hike. Closures of sections of the trail in Washington during the government shutdown forced some hikers to take an unfortunate detour. And early snowstorms left one hiker stranded. And a hiker this year finished the trail in less than 60 days, averaging 45 miles per day.
Contest: Two readers of The Mountain Goat will receive a free DVD copy of “Tell It on the Mountain!†One copy will be awarded to a randomly drawn reader. The second copy will be awarded to the reader who sends me the most interesting personal story from the Pacific Crest Trail, the Continental Divide Trail, or the Appalachian Trail. To enter the random survey, complete Contest 1 below. To enter the story contest, complete Contest 2 below. Complete only one survey; readers completing both surveys will be disqualified. Names, addresses and emails will be used only to notify winners and ship the DVDs; you will NOT be added to any mailing lists. However, your stories from the PCT, Continental Divide Trail or Appalachian Trail may be used in a future article on The Mountain Goat. The contests are open through November 4, 2013, or until 100 entries (per contest) are received. One entry per address.
Disclosure: A review copy and the two contest copies of “Tell It on the Mountain†were provided to The Mountain Goat.
Create your free online surveys with SurveyMonkey , the world’s leading questionnaire tool.
Create your free online surveys with SurveyMonkey , the world’s leading questionnaire tool.
Jackson Peak
Posted by Jim Steele on August 28th, 2013 filed in Gros VentresComments Off on Jackson Peak
At 10,741 feet, Jackson Peak dominates the skyline across Jackson Hole to the southeast from much of the Teton Range. From the summit, you’ll feel like the King of Jackson while you take in sweeping views of the Tetons to the northwest and the vast Gros Ventres to the east. At 5.3 miles each way with 2,500 feet of elevation gain, Jackson Peak makes a perfect day hike.

Jackson Peak (on the far left) above Goodwin Lake on August 17, 2013.
Plus, the trip has a bonus: You’ll pass by the beautiful Goodwin Lake about halfway to the summit. Surrounded by forests and a minor peak, Goodwin Lake is a fantastic place to stop for a break, camp, or jump in for a swim (assuming that you’re not deterred by ice-cold waters).
Even better, the trailhead is only 10 miles from the town of Jackson and, at an elevation of 8,200 feet, you gain plenty of elevation before you even leave your vehicle. Start at the beginning of the Elk Refuge Road at the east end of Broadway Avenue. Stay on the Elk Refuge Road for 4.6 miles, then turn right toward the Curtis Canyon Campground. At 6.0 miles you’ll begin a steady climb up a hill above the Elk Refuge. Continue past turnoffs to the Curtis Canyon Viewpoint and Curtis Canyon Campground at 7.2 miles until you reach a “Y†junction with Sheep Creek Road at 8.9 miles. Turn right and follow the exceptionally rough road until it ends at the trailhead after 1.0 more mile.
You’ll quickly begin hiking up a hillside covered by sagebrush and wildflowers that are likely to be in bloom early in the season and where you’ll catch glimpses of Jackson Peak to the south and the Tetons to the northwest. After a moderately steep section, the trail reaches a canyon rim above Sheep Creek at 0.8 miles. The grade moderates and you follow this rim south for about two miles, spending much of the time in forest but enjoying an occasional view of the Tetons.
At 2.4 miles, you come to a Gros Ventre Wilderness sign and the trail jogs to the east of a hill. If you look behind you, you’ll catch some cool views of the canyon to the north. At 3.0 miles, you cross a small creek and at 3.1 miles you arrive at Goodwin Lake.

Goodwin Lake, photographed August 17, 2013.
Plenty of people hike no farther than Goodwin Lake. A gorgeous alpine cirque at an elevation of 9,500 feet, the lake is popular with both campers and fishermen. You might not have solitude here (the proximity to Jackson and the modest distance make it a popular hike), but you’ll definitely enjoy the scene.

Goodwin Lake, seen from the south shore on September 29, 2010.
You’re 2.2 miles from the summit. You hike along the east shore before beginning a moderately steep climb into meadows directly below Jackson Peak. These rolling meadows are an underappreciated section of the hike. You’ll start to get a few glimpses of the vast Gros Ventre range while you walk along the eastern base of Jackson Peak. You feel like you’re a thousand miles away from civilization, when in reality, the east edge of Jackson is only six miles away as the crow flies.
After you’ve walked through the meadows, you reach an unmarked junction at 4.5 miles (from the trailhead) just before the trail reaches a minor crest and begins heading downward toward trails to Cache Creek and Turquoise Lake. The junction is usually marked with a cairn. Turn to the right. This is where the real work begins; in 0.8 steep miles you’ll be at the top after approaching the summit from the south.

The Tetons seen from Jackson Peak on September 29, 2010.
And what a view! The summit is well above the forest, so there’s nothing to keep you from feeling like you’re on top of the world. All you’ll see to the northeast, east and southeast are the Gros Ventres, including Cache Peak and Sleeping Indian. To the northwest, you’ll see the Tetons and Jackson Lake. Ironically, you can’t see much of the Town of Jackson from Jackson Peak, although the area below High School Butte is visible. Watch for the green roof of the Goodwin Lake ski cabin in the forests south of the lake.

Sleeping Indian / Sheep Mountain seen from Jackson Peak on August 17, 2013.
Jackson Peak can also be part of some longer itineraries. A connection is available to the trails that lead from Upper Cache Creek to Turquoise Lake, so it’s possible to hike up Jackson Peak from the Cache Creek Trailhead. That would be an exceptionally long day (approximately 30 miles), but you could shorten the adventure by mountain biking up Cache Creek and leaving your bike at the wilderness boundary. You could also shuttle a car to the Goodwin Lake Trailhead.
The Gros Ventres seen from Jackson Peak on August 17, 2013.
In addition, campers with a car shuttle sometimes start at the Goodwin Lake Trailhead, camp at Turquoise Lake, then emerge at Granite Hot Springs the next day, wrapping up their trip with a relaxing soak.
Notes: These trails are popular with dog owners. … Be alert; these trails lead through prime bear country. … Once you leave Broadway, the entire route to the trailhead is on gravel roads. Most are in reasonably good shape, but the final mile is exceptionally rough. You may be able to get to the trailhead in a regular car, but a wagon with higher clearance or a truck is highly recommended. … Don’t confuse this Jackson Peak with the one in the Wind River Range. … Snow likely lingers on this trail well into July.
Crystal Butte
Posted by Jim Steele on July 22nd, 2013 filed in Around TownComments Off on Crystal Butte
One of the best things in the world is a great after-work hike. The criteria? You don’t have to drive far to get to the trailhead, you get a serious workout, you’re rewarded with an awesome view … and you can start after 5 p.m. and be done by dusk. Somehow, it gives you the energy to return to the salt mines the next day.
In Jackson, Crystal Butte fits that description perfectly. In 1.7 miles, you’ll gain 1,500 feet, be treated to a view of the Tetons and the town of Jackson, and give your lung capacity a rigorous test.
Crystal Butte looms directly east of Jackson, northeast of Snow King Mountain and just north of Cache Creek. A trail switchbacks up the steepest sections before petering out, and interconnections are available with trails in the Cache Creek area. Much of the butte lies in the Gros Ventre Wilderness, so wilderness regulations apply.

Crystal Butte. Photographed June 5, 2011.
To find the trailhead, look for a short dirt road behind some houses on the east side of Nelson Drive near East Hansen Avenue. After a short drive, you’ll arrive at a small parking area. The trailhead is marked with a large sign on the south side.
After .3 miles, you’ll come to a marked junction. This trail leads up Crystal Butte, but the sign notes that the Crystal Butte trail has been rerouted, presumably to keep the entire butte from eroding into Cache Creek. Obey the sign and follow the main trail for another two-tenths of a mile. You’ll quickly arrive at a marked junction with the new trail up Crystal Butte. Turn left here; this is where your workout really begins.
You’ll follow a long series of switchbacks as you climb up the unforested face of Crystal Butte. Be forewarned – the next 0.8 miles are steep. When you hike back down, you’ll want to make sure that you aren’t carrying a phone or iPod because there is a very real possibility that you’ll slip and fall on your butt. But as you climb, you’ll be treated to views of Jackson, Rendezvous Mountain, Cache Creek, the entire Teton Range and much of Jackson Hole. At .9 miles from the trailhead, you’ll see wilderness boundary signs. Then you’ll cross a small gulch where wildflowers may be seen into July. After 1.3 miles, the grade moderates, then at 1.6 miles, you’ll arrive at a point directly above Woods Canyon with perfect views up Cache Creek. The trail jogs to the north, and within a tenth of a mile, you’ll be treated to views of the Tetons towering over Jackson Hole. (Note that for the best views, you’ll have to step below the trail.)
The Tetons seen from Crystal Butte. Photographed September 13, 2010.
Most likely, you won’t want to go any farther, even though you’re not at the top of Crystal Butte. The trail continues for a few more minutes, but gradually peters out after entering a forest before getting to the actual summit. Bring a snack and enjoy the view of the Tetons (and, if your timing is good, the wildflowers) from the hillside. When you’re done, retrace your steps back to the trailhead.
Notes: Don’t be surprised if you encounter a few mosquitoes, particularly early in the season. … During the first half mile, you’ll be on trails that are popular with cyclists, so be alert. … Although the exposed face means that snow burns off much of Crystal Butte early in the season, be aware that spring closures are usually in effect in April to protect wildlife. … It is possible to hike up Woods Canyon and hike down Crystal Butte (or vice versa), but the trails do not connect, so you’ll have to blaze your own route. Don’t do this if you’re not familiar with the area and aren’t confident in your route-finding ability.